 |
|
Contact Alex Chernov,
Certified Heater Mason
Member of MHA
WETT#8347
Tel. (519) 938-9166
Cell (416) 708-8139
alex.chernov@stovemaster.com
|
|
 |
Articles
Back to articles
Bell heaters: applications for brick bake oven/fireplace combinations.
In recent years, I have built and designed number of successful bake oven/fireplace combinations using the System of Free Gas Movement Theory (Bell heater theory) heater design principles. Purpose of this article is to share our experience and to show possible applications of the masonry heater technology in the wood-fired bake oven field.
Once in a while, I receive requests to build a unit for baking as a primary function, but with a separate firebox and possibility to use it as a fireplace. While designing such units for my clients, I have realized that bell heater design principles apply very well to this situation, allowing to come up with combination units of different size and capacity.
What are the typical requirements for such bake oven/fireplace combinations?
-Baking as the primary function.
-Limited heating function; need for insulated or partially insulated units.
-Baking surface of a decent size.
-Separate (external) firebox with large glass door that along with the main function of heating the oven, serves visual aesthetic function (fireplace).
-Possibility to fire the oven directly (build fire right inside the baking chamber).
The solution for most units for family baking is quite simple: we build a unit that is essentially a symmetrical single- or double-bell heater with enlarged direct bake oven, by-pass damper, and insulate it between the core and the facing as desired by the client. Most of the units built were insulated on three sides leaving only front wall of the facing to transfer heat to the room. As typically these units are built inside kitchen, insulating helps to keep counters and other furniture cool and improves heat retention of the bake oven chamber. Bake oven chamber, being located at the top portion of the bell, keeps heat for a long time due to buoyancy effect.
Size of the bake oven chamber is determined in conversation with the client, discussing their baking requirements. Keeping our standard 18" width of the firebox that works well for our capping technique, we can extend the firebox and make the bake oven chamber up to 40" long, while keeping 20" width. 20"x 27" or 20"x 30" net baking chambers are of sufficient size for most occasional bakers. However, the bake oven chamber can potentially be as deep as 40". 20"- wide oven works well if the firebox is capped with pre-manufactured 12"x24" refractory tiles. It is possible to build units with wider oven using cast-at-the-site refractory concrete capping slabs.
Fireboxes are built with secondary air supply and minimal grate to facilitate clean and efficient burn while keeping high temperatures. Over sizing of the firebox for larger oven chambers further helps to improve combustion of the large loads.

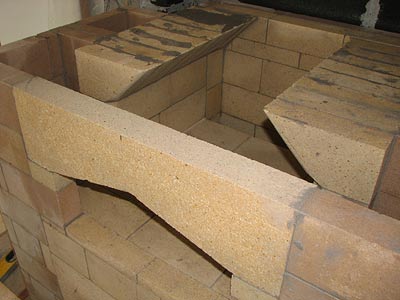
18"wide x 27" deep BIO firebox. White ceramic gasket is visible under the capping tiles on the right hand side.
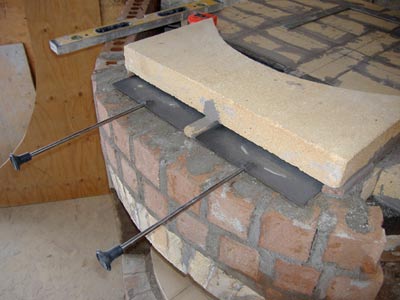
Fireboxes have top portion slopping inward to support capping slabs and induce turbulence. The firebox and bake oven chambers are capped with 12"x24"x2.5" refractory tiles with another layer of 2" firebrick laid flat on top adding mass to the hearth and ceiling of the oven chamber. Joints between bricks on top of the tiles and between tiles are offset for better sealing and structural integrity. The firebox capping tiles are floating on 1/2" ceramic fiber paper gasket, and have 1/2" ceramic fiber gasket at the sides to allow for free heat expansion. Such placement also makes it possible to replace the capping tiles easily through door openings without touching finished facing should the tiles need to be replaced at any time in the future. Narrow throat is located at the far end - back of the bake oven chamber.
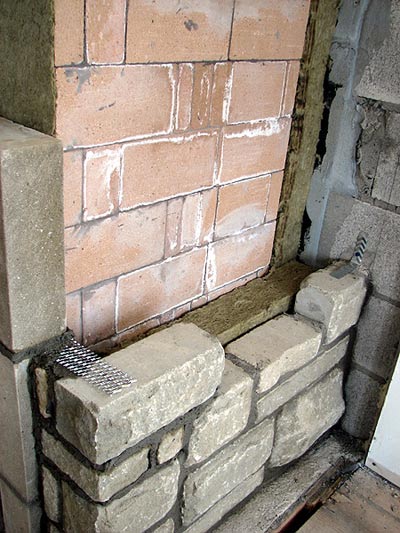
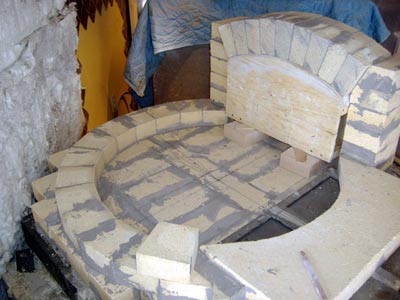
Bake oven chamber before capping.
This particular bake oven chamber is 20"x27", and it has double sidewalls. Additional row of 2" firebrick is set over a ceramic gasket on top of the capping assembly. The white gasket can be seen underneath the wall on the left hand side. Cut large refractory tile is used as lintel over the bake oven door opening.
There are two symmetrical exits to the bell from the bake oven chamber at the front. The sidewalls of the bake oven chamber are sloping inward on the last row for better support of the capping tiles and to induce favorable turbulence inside the oven chamber. It has been noticed that direct bake oven chambers that have smooth transition between vertical walls and capping allow for better flame/gases path that results in overall cleaner surfaces inside the chamber. The flames don't break up at inside corners, but instead keep rolling inside burning most soot out from the walls.

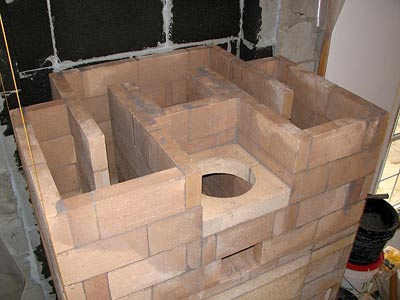
Bake oven chamber before capping. Top view.
You can see symmetrical layout with updraft channels located at the back of each side of the bell. Inside walls of the updraft channels facing the bell are double brick to slow down heat transfer from hot bell into cooler gases in updraft channels thus keeping more heat inside the bell. Firebox throat at the back is typically 3" wide all along the back wall.
It is very easy to increase depth of the bake oven in such layout in bell heater. Side portions of the bell including updraft channels may follow the central firebox/bake oven part of the unit or may stay at front as in this particular unit.
Finished bake oven chamber is 13 1/2" high.
Such baking/fireplace combination units can either be vented into a freestanding masonry chimney from the bottom at the back, and in this case it will be a single-bell heater, or top vented through the second bell. Second bell allows shifting the chimney location as desired within centerline of the unit, giving flexibility with chimney pipe location. Second bell keeps more of the hot gases inside making the unit more efficient than a single-bell version. If a single bell option is selected, top of the unit must be heavily insulated to store heat inside the bake oven chamber, not allowing the top to cool down fast.
The second bell before capping. Chimney connection point for 8" round chimney with clean-out underneath can be seen at the front wall.
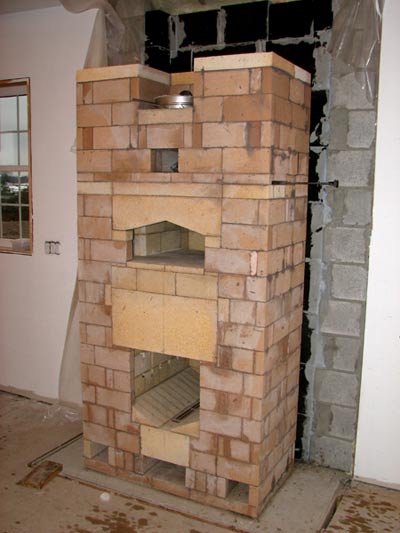
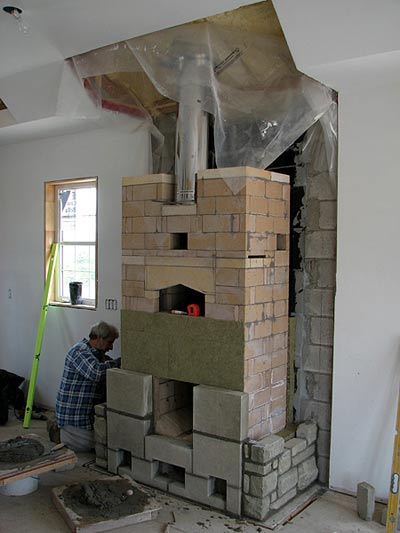
Finished core with the second bell on top transferring exhaust gases to the centrally located chimney.
A standard stainless steel pivoting damper-anchor plate by the chimney manufacturer can be seen at front. The core is built into niche in outside walls. The niche is insulated with 4" foamglass. 3 1/2" mineral wool insulation will be added at the sides. A by-pass sliding damper can be seen on the right hand side. By-pass damper is installed on one of the sides outside the bake oven chamber to allow building fire right inside the bake oven for direct firing, and for easy cold start-up. Choose a gasketed bake oven door with an air supply slot for possible direct firing.
Although the described units have direct or "black" bake oven that on my opinion is better suited for extensive creative cooking and baking, it is possible to build such units with an enclosed or "white" bake oven. Size of the unit will increase in this case, and layout above the firebox will be different to allow for the bake oven chamber to float freely inside the bell.
Facing considerations
Facing the unit where only one wall gets heated poses a problem of potential cracking in the facing due to uneven heat expansion of the facing material. One possible way to deal with cracking is to have a recessed joint of different facing materials at the line of future hairline cracking. A hairline crack at the recessed conjunction of two materials is not very noticeable and typically doesn't create visual distraction. This solution is used in the described unit that is finished with rough man-made stone and smooth architectural block (picture of the finished unit below). The front and side walls are joined with expanded metal lath ties that should allow for some vertical movement without pulling sidewalls up, while still providing lateral support. Another possible solution is deliberately leaving the expansion joint in the facing while keeping metal ties for lateral support, and filling the expansion joint with matching flexible caulking.
The third solution that is used in the unit pictured the last, is to finish rough clay brick facing with "dry-laid" look natural stone veneer attached with acrylic thin-set mortar. Such stonework is done without mortar in thin joints between stones and any possible hairline cracking in the brick facing behind is hidden in the joints between pieces of stone veneer. The pictured thin stone-faced heater is in operation in its third season without any problem.
Completely insulated units will not have such problem at all, and offer freedom of facing design.
Notice expanded metal lath ties between block front face and stone sides. Due to lack of space on the foundation for the back facing wall, the insulated sidewalls are tied to the block wall at the back with brick ties.
Facing continued. 1/2" mineral wool expansion joint gasket at the front.
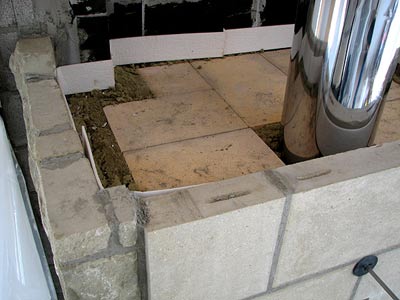
Top of the core before pouring the vermiculite/cement mixture. Note mineral wool insulation between sidewalls of the facing and the core.
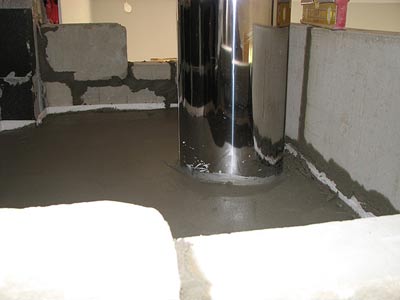
Double-bell unit is sealed on top with vermiculite/cement mixture maintaining ceramic fiber gasket around the facing to allow for core movement without breaking the seal.
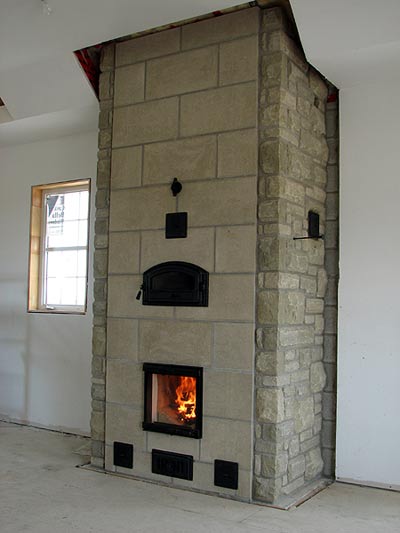
Finished unit faced with man-made stone and architectural block manufactured by Arriscraft company.
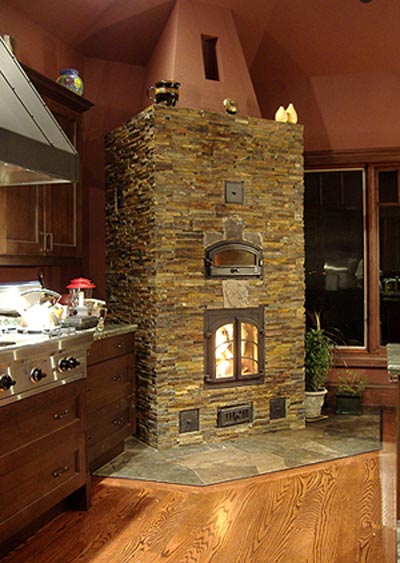
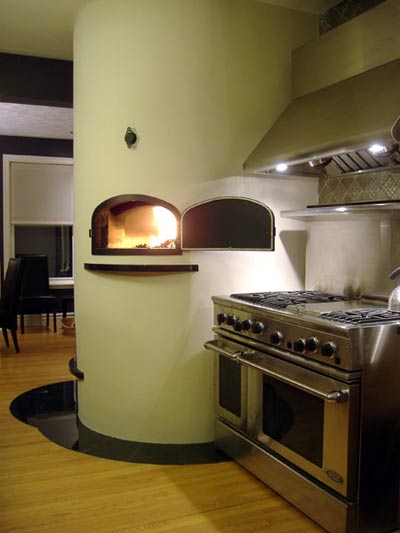
Another partially insulated combination unit used primarily for baking. Rough clay brick facing is covered with natural thin stone veneer. The owner, a chef leading cooking classes in this kitchen, reports great baking capabilities of the unit. They typically use the oven on Saturdays only. They burn a full load on Friday evening, followed with another full load on Saturday morning and then use oven for baking later through the day. The owner is so excited about the oven that decided to write an article about it for a food magazine.
Completely insulated units with open fireplace.
It is possible to construct combination units with open fireplace, although in those designs it is impossible for fire in the fireplace to heat the oven chamber - the oven will have to be fired separately. Low combustion temperatures and great amount of air passing through the open fireplace result in overall temperature of the gas flow that is too low to heat up the oven to necessary temperatures.
One option for such combination units is to vent fireplace and oven to separate chimney flues. Fireplace and oven can be fired simultaneously in this case, however, this solution increases size of the unit and adds to the overall cost for the extra chimney flue. Another option is to vent the fireplace through the bake oven chamber, using bake oven chamber as a smoke chamber. The difference between a typical smoke chamber and a bake oven chamber is that the first is a volume with exit at the top, and the last is a volume with exit at the bottom - essentially a "bell". It is possible to vent open fireplace through the oven chamber successfully, however, chimney flue size will restrict maximum possible size of the fireplace opening. This is a dilemma: if we want a larger fireplace, we have to go with a larger chimney. A larger chimney, however, will draw a lot of heat out of the oven when oven is fired making the oven not very efficient. A possible solution to this problem is to use larger chimney size together with an adjustable damper that can control draft.
In any version of such combination units working on single chimney flue, either the oven or the fireplace can be fired at one moment, not two together. The oven chamber, that can be either a dome or a vault, should be heavily insulated.
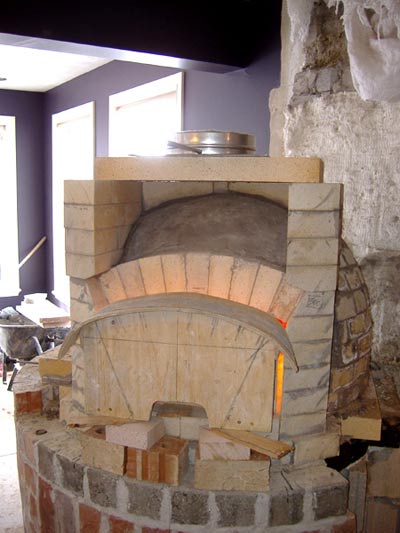
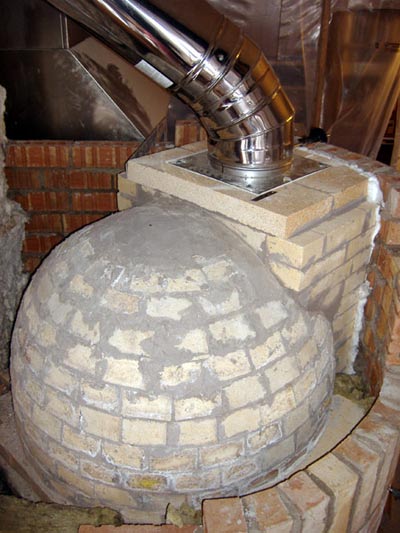
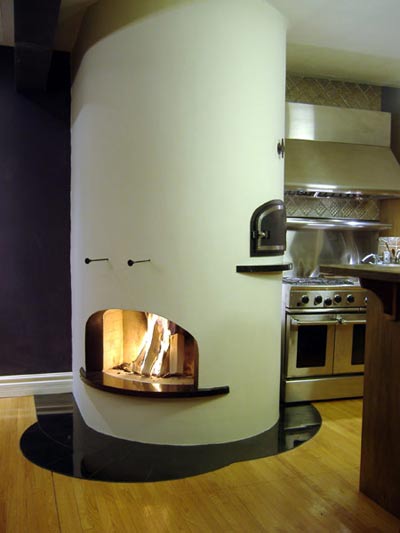
An example of such combination unit: A cylinder-shaped unit with open fireplace and a 30" dome oven on top, vented through a single partially insulated 8"ID chimney flue stainless steel liner inside an existing exterior masonry chimney.
Challenges for this particular unit were:
-Limited space of the existing foundation from the previous fireplace;
-Existing exterior chimney that would only fit 8" stainless steel liner;
-Limit with the height of the fireplace opening that had to fit underneath oven hearth construction to come up with suitable 48" height of the oven's hearth;
-Fireplace and bake oven opening centers had to be located at 90o angle from each other;
-Tricky unconventional chimney connection.
The solution:
-Additional reinforced concrete support slab on top of the existing one, cantilevered 1/3 at the front;
-A low and wide fireplace opening of the maximum area allowed for such chimney cross-section;
-30" diameter dome oven that gives maximum baking area within limited dimensions of 54" diameter circle.
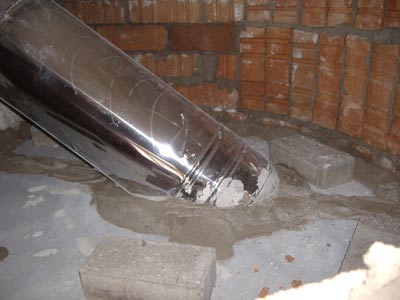
-Stainless steel insulated chimney offset to enter an existing masonry chimney.
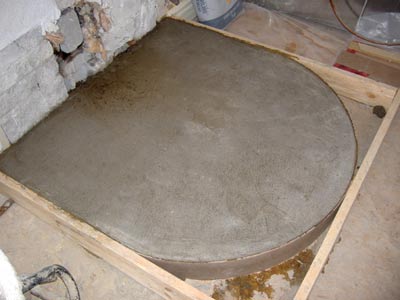
Structural cantilevered slab on top of existing slab.
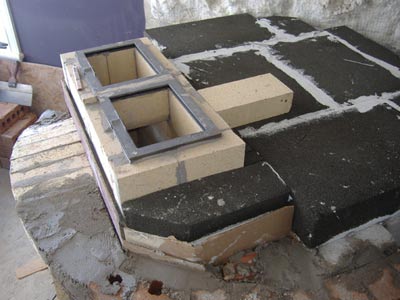
8" concrete block was used to create structure around the fireplace firebrick liner to support bake oven hearth. Foamglass insulation was used underneath oven's hearth.
Large refractory tile is used to cap the dampers and support the dome.
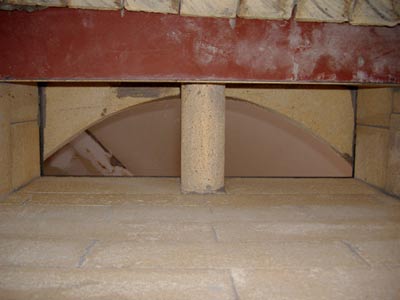
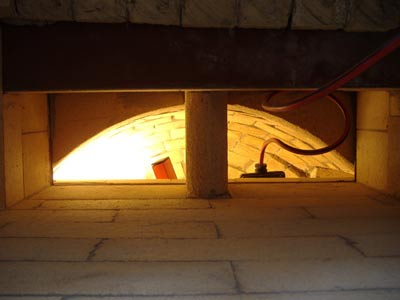
Looking up fireplace throat. Opening at the damper level.

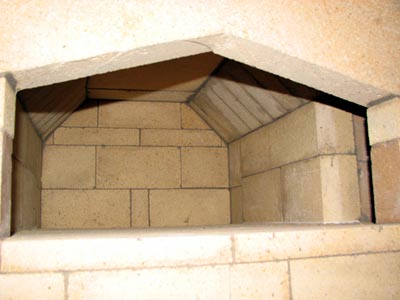
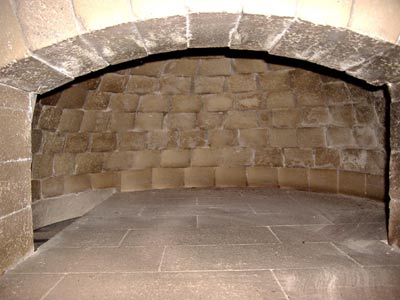
Sand form is used in the dome construction. Arch over the opening was laid first.
Due to limit of space, the chimney connection smoke chamber above oven door was constructed only with three walls built of refractory brick. Facing brick formed front wall of the smoke chamber. Connection lines of the refractory walls of the smoke chamber and clay brick facing were gasketed tight with ceramic blanket. Clay brick surface facing inside of the smoke chamber was parged with 1" thick layer of CHAMBERTECH 2000 refractory parging mix for better thermal protection. A standard stainless steel pivoting damper anchor plate was used to connect from masonry to the stainless steel insulated chimney.
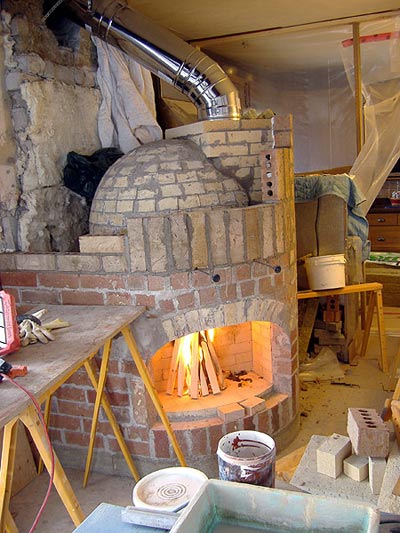
The fireplace was tested right after chimney was connected. The oven door opening was plugged with a piece of mineral wool. Fireplace operated well despite of the fact that area of the opening was at the maximum ratio to the chimney size and throat of the fireplace was far from ideal having restriction in the shape of the capping slab/dome over the damper connection. Vertical placement of the wood helps to stabilize operation during windy weather conditions.
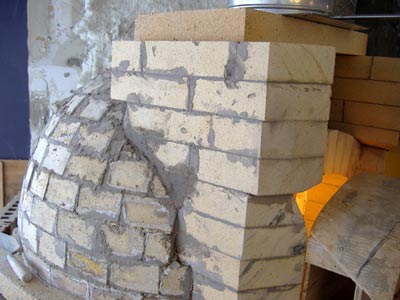
Arches over fireplace and oven openings in the curved facing walls were a challenge due to the compound curvature of the openings. Arch over the fireplace opening was done using #1 arch firebrick. Firebrick was cut at the back at an angle and smoothed out with grinder to facilitate smooth airflow over the lip.

Space between the brick rough facing and refractory core was filled with mineral wool insulation. Curved facing walls were formed by laying clay brick standing on the narrow side (soldiers). Rows were bonded.
Sealing the top above the oven with cement board over thick mineral wool insulation.
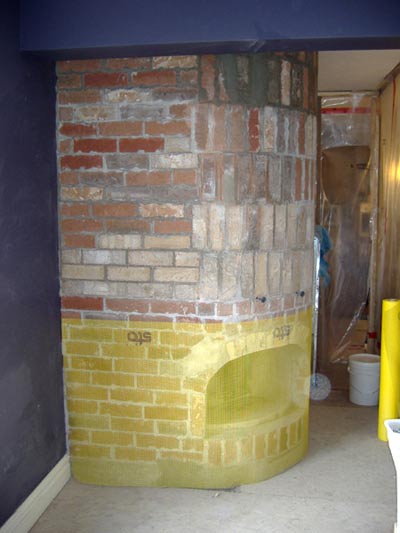
Rough clay brick face was plastered with 4 coats of white thin-set mortar followed with two coats of drywall compound. Fiberglass stucco mesh was embedded into the first thin-set coat. Finished surface was sanded and painted with latex paint.

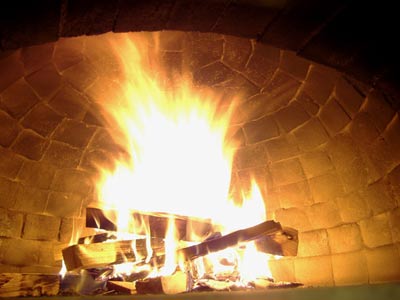
Test fire in the oven.
A curved custom gasketed steel door for oven was skillfully made at a local metal shop according to my template and design. The door has stainless steel latch, hinges and trim over black painted mild steel.
The owners report that the oven keeps the heat for more than a day allowing them to do a great variety of food.
Other possibilities of design.
Using similar design principles within the System of Free Gas Movement, it is possible to design a unit with external enclosed firebox and an indirectly heated dome or vaulted oven on top. The oven can be "black" or "white". Size of such unit can be different from relatively small residential to large commercial units. Such flexibility is one of the greatest advantages of the System of Free Gas Movement or Bell Heater Theory developed by famous Russian heater mason and engineer Igor Kuznetsov. To read more about the theory and design principles please visit the following sites:
http://www.stovemaster.com/html_en/designsystem.html
http://www.stove.ru/index.php?lng=1&rs=16
|
|
|
|
|
|
|